Derrotación de Imagenes con WinJUPOS
En este capitulo de WinJUPOS vamos a aprender a derrotar
imágenes planetarias. Las dos principales utilidades son:
- Derrotar varias imágenes de un canal para
obtener una imagen con mayor detalle.
- Derrotar las tomas de cada canal en
B/N para obtener una composición en color derrotando las imágenes.
Es muy importante que las imágenes utilizadas en este proceso
estén medidas correctamente (Si tienes dudas tienes nuestro tutorial de
medición) y los archivos .ims generados. Empezaremos con la derrotación de
varias imágenes B/N pertenecientes a un canal.
Por ejemplo, partimos con una serie de archivos de medición,
resultantes de sendas imágenes pertenecientes al canal rojo en Júpiter durante la
misma sesión de astrofotografía. Hay que tener en cuenta que las imágenes deben
ser de la misma noche, no vale tomar imágenes de una sesión anterior pues el
software creara una imagen muy arrastrada al tratar de derrotar la toma en
exceso para adaptarse a las demás.
In
this chapter of WinJUPOS we will learn to defeat planetary images. The two main
utilities are:
-
Derotate several images of a channel to obtain an image in greater detail.
-
Derotate the shots of each channel in B / N to obtain a composition in color
defeating the images.
It
is very important that the images used in this process are correctly measured
(If you have questions you have our measurement tutorial) and the generated
.ims files. We will start with the defeat of several B / N images belonging to
a channel.
For
example, we start with a series of measurement files, resulting from two images
belonging to the red channel on Jupiter during the same astrophotography
session. Keep in mind that the images must be the same night, it is not worth
taking images from a previous session because the software will create a very
dragged image when trying to defeat the shot in excess to adapt to others.
Abrimos el software y seleccionamos desde la pestaña Program/Celestial Body el cuerpo
celeste que vamos a derrotar. Entonces ejecutamos la herramienta De-rotation of images que encontramos
en la pestaña Tools, aparecerá
entonces la ventana de trabajo.
El primer paso es cargar los archivos de medición que hemos
generado previamente, para ello seleccionados en la parte superior derecha la pestaña
Edit y Add. Al cargar los archivos aparece un disco gris que simula el
disco planetario con unas bandas verticales, estas lineas indican la posición
temporal de los archivos cargados. Es mejor que las tomas tengan un desfase
temporal pequeño para que la derrotación sea mas sencilla y no aparezcan
limbos muy arrastrados.
We
open the software and select from the tab Program / Celestial Body the
celestial body that we are going to defeat. Then we execute the tool
De-rotation of images that we find in the Tools tab, then the work window will
appear.
The
first step is to load the measurement files that we have previously generated,
for this select the Edit and Add tab in the upper right. When loading the
files, a gray disk appears that simulates the planetary disk with vertical
bands, these lines indicate the temporary position of the loaded files. It is
better that the shots have a small time lag so that the defeat is easier and no
dragged limbs appear.
Ahora bien, podemos indicarle a WinJUPOS que imagen queremos
sea la referencia temporal y cual el que sirva para optimizar las medidas.
Fíjate que cuando modifiquemos esta característica las lineas verticales de la
respresentación del disco planetario cambiaran. Para modificar esta
característica, pinchamos con botón derecho aquella imagen que deseemos y
seleccionamos como Set as time reference
o Set as reference for optimization.
AstroPlanetaria recomienda seleccionar Optimize Image measurements para que la derrotación tenga mayor
calidad. Si bien seleccionaremos Stretch
luminescense to maxium dynamic range cuando las diferentes tomas tengan
diferentes niveles de histograma y queramos llevarlas a un mismo nivel.
Seleccionamos desde Image
type que tipo de archivo queremos, en este caso seleccionamos PNG(48 Bits) pero también es
aconsejable TIFF(48 Bits). Un punto
muy importante para posteriormente derrotar cada canal y componer una imagen en color es mantener el
mismo tamaño de imagen. Respetaremos el número de pixeles por lado configurado
en Quadratic image size para cada
derrotación. Del mismo modo podemos decidir que orientación polar tendrá la
imagen con Image orientation.
Ya podemos arrancar el procesado pulsando Compile image o bien F12. La imagen será de un contraste
superior a las originales al haberse apilado. El resultado se muestra en la
siguiente imagen.
Now,
we can indicate to WinJUPOS what image we want to be the temporary reference
and which serves to optimize the measurements. Notice that when we modify this
feature, the vertical lines of the planetary disk representation will change.
To modify this feature, right-click on the image you want and select Set as
time reference or Set as reference for optimization.
AstroPlanetaria
recommends selecting Optimize Image measurements so that the defeat has higher
quality. Although we will select Stretch luminescense to maxium dynamic range
when the different shots have different histogram levels and we want to take
them to the same level.
We
select from Image type what kind of file we want, in this case we select PNG
(48 Bits) but TIFF (48 Bits) is also advisable. A very important point to
subsequently defeat each channel and compose a color image is to maintain the
same image size. We will respect the number of pixels per side configured in
Quadratic image size for each defeat. In the same way we can decide which polar
orientation the image will have with Image orientation.
We
can now start the process by pressing Compile image or F12. The image will be
of a higher contrast than the originals when stacked. The result is shown in
the following image.
En este punto podemos postprocesar con FitsWork aplicandodeconvolución para mejorar el contraste. Ahora realizamos el mismo proceso con
todas las tomas de cada canal y obtenemos una imagen derrotada por cada uno de
ellos.
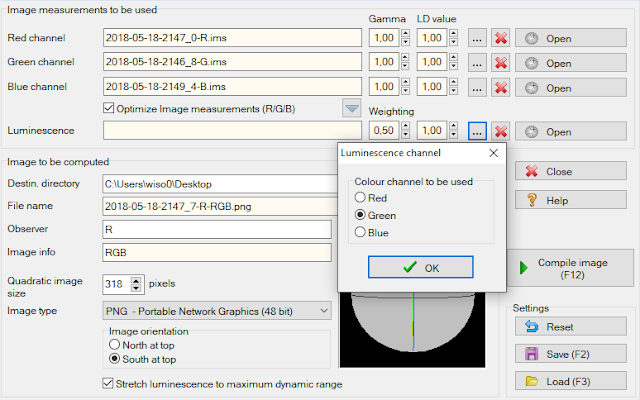
Abrimos la herramienta de derrotación LRGB De-rotation of R/G/B frames presente en
Tools. La mecánica es muy parecida a
la anterior, cargamos los archivos de medición (se han generado automaticamente
junto con cada canal derrotado) desde la selección al lado izquierdo de la cruz
roja. Hay que tener cuidado en seleccionar correctamente cada canal en su lugar
correspondiente. Si dispones de canal de luminancia, al cargarlo te permitirá
decidir a que color aplicar el peso.
At
this point we can postprocess with FitsWork applyingconvolution to improve the
contrast. Now we perform the same process with all the shots of each channel
and we obtain a defeated image for each one of them.
We
open the LRGB De-rotation of R / G / B frames defeat tool present in Tools. The
mechanics is very similar to the previous one, we load the measurement files
(they have been generated automatically together with each defeated channel)
from the selection to the left side of the red cross. Care must be taken to
correctly select each channel in its corresponding place. If you have a
luminance channel, loading it will allow you to decide which color to apply the
weight.
Las demás opciones quedan como la captura de imagen y son idénticas a
la herramienta de derrotación de imágenes. Solo queda arrancar el procesado con
Compile image o bien F12.
El resultado muestra un contraste de detalles solo posible
mediante la técnica de derrotación. Para terminar con el procesado es
aconsejable realizar deconvolución con FitsWork para regenerar la señal y ganar
calidad de imagen.
The
other options are like the image capture and are identical to the image
deletion tool. It only remains to start the processing with Compile image or
F12.
The
result shows a contrast of details only possible through the technique of
defeat. To finish with the process it is advisable to perform deconvolution
with FitsWork to regenerate the signal and gain image quality.
Hasta aquí el tutorial de derrotación de imágenes con
WinJUPOS, pasate por nuestra sección de Captura y Procesado para mas contenido.
So
far the tutorial of defeating images with WinJUPOS, go through our section of
Capture and Processing for more content.


Comentarios
Publicar un comentario